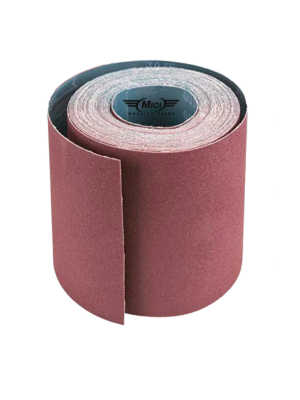
MICI Sandpaper Roll
Starting From RM XX
Designed for smoothing surfaces, removing paint or rust, and preparing materials for finishing.
Details
- Made from abrasive materials like aluminum oxide, silicon carbide, or garnet, which are bonded to a paper or cloth backing.
- Designed to be durable, efficient, and capable of producing a smooth finish on wood, metal, plastic, and other surfaces.
How to use
-
1. Choose the Right Grit
- Select the right grit based on the task:
- For rough surfaces or paint removal, start with a coarse grit (40-60 grit).
- For smoothing surfaces, use medium grit (80-120 grit).
- For finishing and preparing the surface for paint, use fine or extra-fine grit (150-220+ grit).
2. Prepare the Surface
- Clean the surface to remove any dust, dirt, or debris.
- Ensure the surface is dry and free of oils or greases that might prevent the sandpaper from working effectively.
3. Cut or Tear Sandpaper to Size (if needed)
- If you’re working with a sanding block, electric sander, or hand tool, cut or tear the sandpaper to fit the tool. For hand sanding, you can simply use the sandpaper as is.
4. Use the Correct Sanding Technique
- For Hand Sanding: Hold the sandpaper tightly and sand in smooth, even strokes, following the grain of the wood or the direction of the surface you’re working on. Apply moderate pressure, but don’t press too hard, as this can cause uneven sanding or gouging.
- For Power Sanders: Attach the sandpaper to the sander (orbital or belt sander), ensuring it’s securely fastened. Hold the sander firmly and let the tool do the work. Move the sander in smooth, overlapping passes to avoid uneven sanding marks.
- For Metal or Painted Surfaces: Sand in circular or back-and-forth motions, depending on the type of surface you’re working on. Always ensure you are consistent in your motion to prevent uneven sanding marks.
5. Sand in Multiple Stages
- Start with a coarser grit if the surface requires heavy sanding (e.g., removing paint, smoothing rough wood), and progressively move to finer grits to achieve a smoother finish. Each subsequent grit should be finer than the previous one to remove scratches and refine the surface.
6. Clean Between Sanding Stages
- Periodically wipe down the surface with a clean cloth to remove sanding dust. This will help prevent the dust from scratching the surface during the next sanding stage.
- If you’re using an electric sander, some models come with a dust collection bag or vacuum attachment to reduce the amount of dust generated.
7. Final Touches
- For final finishing, use fine or extra-fine grit sandpaper (220 grit or higher) to smooth the surface and prepare it for painting, staining, or sealing.
- When sanding between coats of paint or finish, use very fine grit sandpaper (400 grit or higher) to remove imperfections and achieve a polished surface.
- Select the right grit based on the task:
Additional information
| Sizes | 1L |
|---|
key information


-
Details
-
How To Use
-
Available Colours
Available Colours
Lorem ipsum dolor sit amet, consectetuer adipiscing elit, sed diam nonummy nibh euismod tincidunt ut laoreet dolore magna aliquam erat volutpat. Ut wisi enim ad minim veniam, quis nostrud exerci tation ulla
How To Use
Lorem ipsum dolor sit amet, consectetuer adipiscing elit, sed diam nonummy nibh euismod tincidunt ut laoreet dolore magna aliquam erat volutpat. Ut wisi enim ad minim veniam, quis nostrud exerci tation ulla
Available Colours
Lorem ipsum dolor sit amet, consectetuer adipiscing elit, sed diam nonummy nibh euismod tincidunt ut laoreet dolore magna aliquam erat volutpat. Ut wisi enim ad minim veniam, quis nostrud exerci tation ulla

